

")
This is a post from me – Anne – just showing you what the sealers are that I use. I try to troubleshoot so many different sealers for others but I only use these.
I always think about what I am making first –
Art Rock – Highly decorative, kept inside never has direct sun or rain.
Garden Rock – A rock I leave in my garden that has full sun, rain , morning dew etc
Drop Rock – A rock I share and hide in my community for others, it is exposed to light/sun, rain etc in shorter bursts.
Let’s chat about the sealers I use and which one I like the best … Love Anne
")
SPRAY ON SEALERS – Has it’s pros and cons. I live in a country where I can be outside all year around – We never wear hats and scarves – it does not snow. We do get some tropical rains here and there – but on the grand scheme of things I can go outside and spray. I am very aware many of you cannot have spray sealers in your lives.
1. You do not have the weather for it
2. You do not have the health that can do aerosal sprays.
These are the two brands I use in Australia -I know other countries do not have these brands but I have explained their qualities that you can match up to a brand in your country.
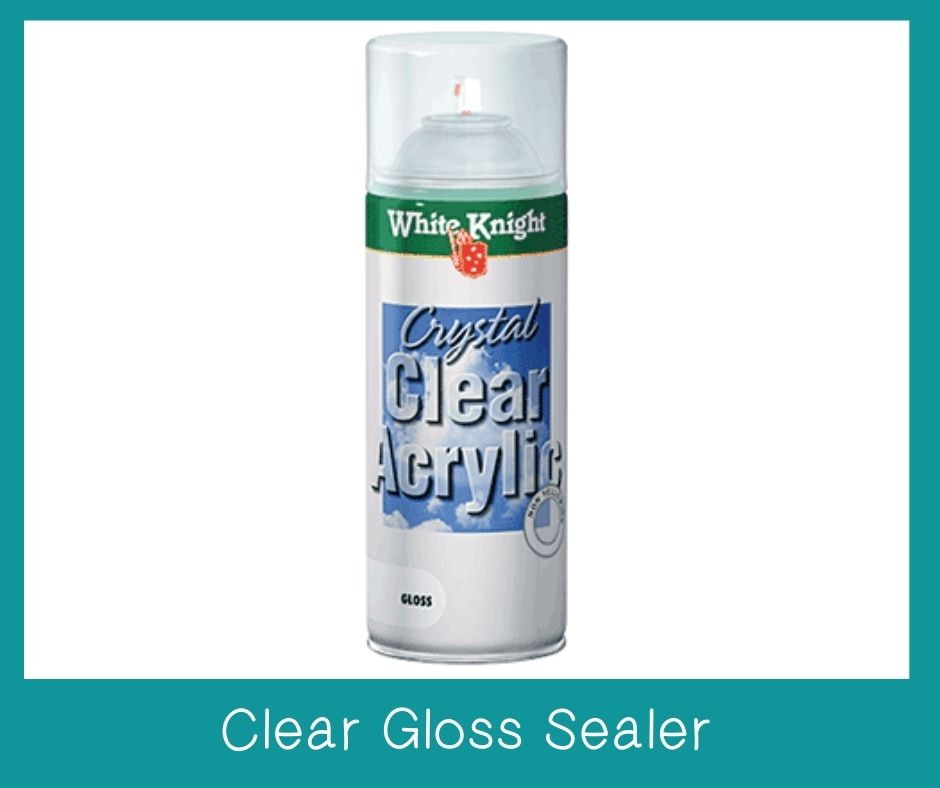
Features
• Clear finish
• Provides a protective coating over oil and water based paints
• Resists cracking and yellowing
• Interior and exterior application
• Adjustable aerosol spray nozzle
• Safe to spray – CFC and lead free
• Non-chroming formula
• Quick drying
• Available in a clear gloss and satin finish
Their adjustable fan spray nozzles make them super easy to apply allowing them to be used on a range of different applications. Export paints are fast drying.
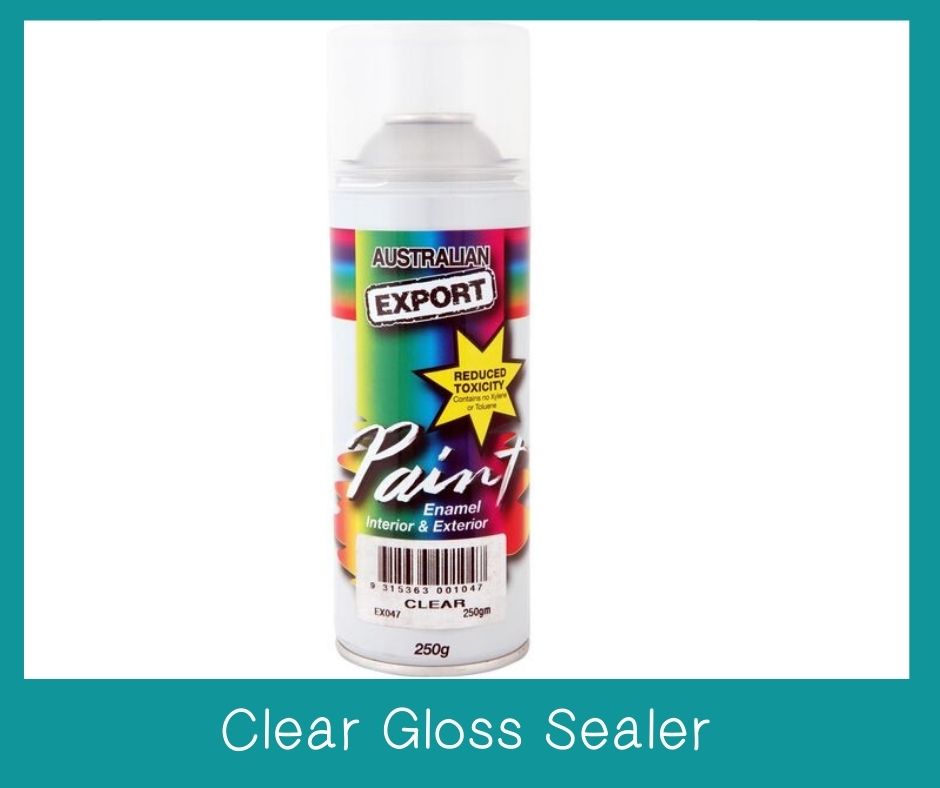
Features
- 250g
- High quality, quick drying spray enamel
- Use for interior & exterior applications
- Adjustable fan spray nozzle
- Reduced toxicity (contains no Xylene or Toluene)
- Not recommended for automotive use
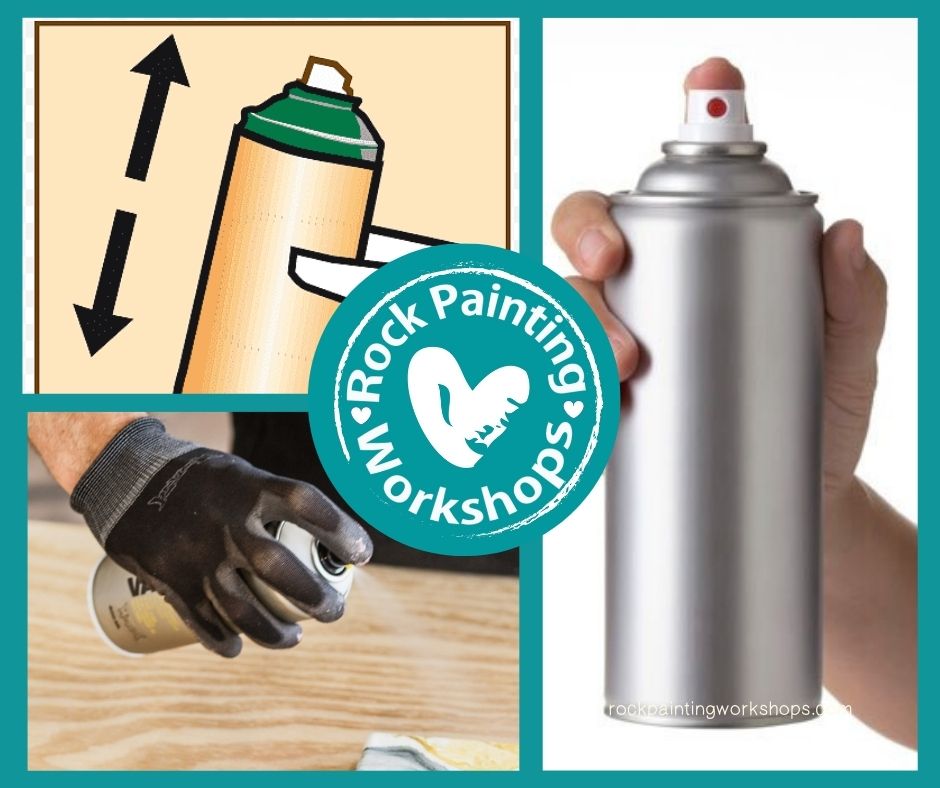
How to spray your Rocks
Always shake your can before each use and follow the instructions found on the brand that you are using. Handy Hint – Spray fine mist layers and do not hold the spray too close. This is important on the first layer especially – you want to SET the colour with a fine mist layer and let this DRY. Do not spray too close and too heavy so it pools or is really wet – that can reactivate your paint or paint pen. Spray another 1-2 layers normally to get the desired finish you want. The first layer is to set the colour so it does not bleed. The other layers is to achieve the look you want.
Most times when your Acrylic paint pen bleeds it is because you sprayed too thick , too close and being so wet it reactivated the paint pens so they bled.
Brush on Sealer – These are the two that sit on my desk and I use daily. They are my favourites. So drama free ! I have done 30 days testing on both of them. They are easy to use – dry super fast and both kept my rocks safe from sun and moisture in the 30 days of testing outside. Neither of them made my rocks bleed and I have those tests below for you to see. This method is so easy for me that I rarely spray seal anymore. I had to mention them above as when I started I did use them as advised by others but these brush on sealers means it all gets done at my desk.
Liquitex sealer – AUSTRALIA CLICK HERE
Liquitex sealer – USA & other Countries CLICK HERE
Cabots – CLICK HERE This lasts forever ! 1000’s of rocks
")
This is a CLEAR Polyurethane Sealer it is hard wearing and fast drying.
It comes in matte, satin & Gloss finishes.
~It is water wash up
~Touch dry in 2 hours for 2nd coat
~ UV protectant
~ Non yellowing
My rocks are dry and ready to be shared overnight. I have used it on a rock that was painted & left to dry for 10 minutes. ( sample below)
It repels water and prevents water absorption, but it never fully blocks it so it will never make it 100% waterproof. But then no sealer does.
I transfer some to a jar for my desk so I have a small jar of it rather than a big tin.
")
Medium is an all-purpose product that performs two functions. It can be used as a varnish sealer and/or a fluid medium that enhances the flow of acrylic paint without diluting it or affecting its colour. Medium won’t split or crack as they dry.
Acrylic mediums contain binder as do Acrylic paints so they are very compatible as it expand and contract together during the drying process. This is the perfect product to avoid Acrylic Pen bleeding.
~ Lightfast & Archival
~ Permanent
~Non Yellowing
~ Flexiable and non-cracking
~ Water Resistant when dry
You want to use the first layer to set the colour -Do not overwork it , the more you fuss on a rock and keep brushing you could reactivate colour and it smears. On the first layer you want to paint on a light layer of a few strokes. Let that dry so it sets the colour then add your desired coverage for the glossy look as your 2nd coat.
Oh and just another hint – Do not use those scratchy cheap hogs hair brushes they are really harsh when applying sealer and worse they leave brush stroke lines in your work. Use a softer taklon brush and clean it well after use.
Grab some empty glass jars and using a syringe you can make up some handy small jars of sealer for your desks. I have a couple on the go so no running out in the middle of the night!
Syringes
CLICK HERE – Australia
CLICK HERE – USA & other countries
Liquitex sealer – AUSTRALIA CLICK HERE
Liquitex sealer – USA & other Countries CLICK HERE

This is a polyurethane sealer that is available in the USA. It is water Based and you can get it in dofferent finishes – Satin & GLoss
")
")
")
")
Test Rock 1.
The 3 was a writing mistake I scribbled out
Top half Supplies-
CLEAR Polyurethane Sealer as above and Posca Pen
Sealed after 6 hours from writing on the rock
RESULT – Zero smearing when sealed
Bottom half Supplies-
Liquitex gloss Medium as above and Posca Pen
Sealed after 6 hours from writing on the rock
RESULT – Zero smearing when sealed
Applying a first thin layer that is not overworked sets the colour. I had to change the sealing time to 3 pm. When the sealer was dry I just wrote that 3 on top.
Test Rock 2.
Left hand side Supplies-
CLEAR Polyurethane Sealer as above, Posca pen colour on base and Posca Pen writing.
Test 4 was sealed at 12 hours
Test 3 was sealed at 24 hours
RESULT – Zero smearing when sealed no difference between the two
Right hand side Supplies-
Liquitex Sealer as above, Posca pen colour on base and Posca Pen writing.
Test 1 was sealed at 12 hours
Test 2 was sealed at 24 hours
RESULT – Zero smearing when sealed no difference between the two but it is slightly less shiny than the Polyurethane.
TEST ROCK 3.
This experiment is exactly the same as above. The only difference is the base coat is Americana acrylic Paint.
I got exactly the same outcome using the same sealers.
TEST ROCK 4.
Supplies – Liquitex Gloss Medium & Posca Pen 1m
~All the text was written at 5.30am
I sealed each section separately at different times
~1 hour after writing
~12 hours after writing
~24 hours after writing
~36 hours after writing
RESULT – No bleeding or smearing. I wiped over it all with a damp cloth with no side effects.
When you start using a new sealer you have never used before you should create a rock similar to test rock 4. Your sealer may smear the writing at 1 hour but not after 24 hours. You do not know if you do not test it to find out. Then take this rock and leave it outside for 30 days to see what happens. Only now would you get an idea on how your sealer will work
If my rocks are going out in the garden long term – I use my brush on liquitex sealer as a thin coat to SET MY COLOUR then I paint Clear polyurethane pavement sealer on it as it is great for outdoors. –
- Clear satin to gloss finish
- Hard wearing
- Resists stains and damage to substrate
- Resists algal and other growth
- UV stable
- Safe and easy to use
- Highly water repellent
Crommelin Brand – Click HERE – DO NOT FORGET TO SET THE COLOUR FIRST
Behr Brand – Click HERE – DO NOT FORGET TO SET THE COLOUR FIRST
SEALERS – Oh dear… this seems to be the MOST controversial subject in the rock painting world! We get that, everyone has an opinion and wants to be heard. There are so many to choice from – Sealers & opinions, so how do you decide? Yes we also have what we think works great and we are not saying your method does not. We spend 30 days testing our methods at the least
Do you want to hear about some other great sealers and how to use them ? CLICK HERE


Our Supplies page is HERE to read up on everything you need to paint Rocks.
Learn heaps of different techniques on how to paint rocks – Right HERE
We are adding new tutorials all the time CLICK HERE for heaps of new ideas
